This post is on an idea that i had last summer to make the hoop house plastic much less painful to work with :). And that is, i'm adding some weights to the sides of the plastic to hold it down. Last year I put cement blocks on the plastic to hold it down, and it worked great, except the 1 night I had to take them off because it got so hot last year (it was 90 degrees inside the plastic like in early march) I never wanted to put the plastic back on, it was simply too much work taking it on and off. As a result the plastic never got put away properly, and got cut up to be used as a super awesome slip and slide which the kids absolutely loved (our property is a big hill).
Stuff I had to buy (per 10ft raised bed)
- 1 package of grommets - like Brass Grommet Kit Size 4 (1/2 in.) (Google Affiliate Ad) (though lowes had it a bit cheaper, just make sure to get 24 grommets and a kit)
- 6 mil plastic (though I already had plenty :))
- 2x 3/4 inch electrical conduit pipes. The metal ones, slightly larger than the ones i bought to build the hoophouse supports.
Other items to get
- 1 sheet of cardstock paper (normal sized sheet)
- some other large square measuring device (i used a cardboard box from christmas that was flattened, you could use anything that's got straight edges and is 2 ft or so tall.)
- a hammer to work with the grommets
- a piece of wood to go under the plastic so that you can cut out the holes
How to build half #1
 |
| This is "the finished product" of half 1 |
- Cut off a piece of plastic roughly 16-18ft long, by 10ft wide. That gives an extra 3-4 feet on each side of the raised bed.
- Take your sheet of cardstock paper, and put 2 marks on the edge, at 1inch and 5.5inches. This paper becomes your guide as to where to punch the holes, and it made things super nice.

- Every 1.5 feet or so use the cardstock to mark the plastic. So that there is a mark 1inch away from the edge, and then one at 5.5 inches. Use the side of the sheet of paper on the side of the plastic so that you know your cuts are "square". This helps make it so the plastic doesn't twist and pull funny, and it's why we used a piece of cardstock. Use a perminent marker to mark the spots.
- Use the hole punch that comes with the grommet set and punch out a hole where you have your marks, cut out every mark.
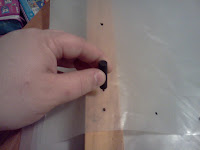

- Use the grommet tool to put in the grommets by folding the holes and matching them up. This will make a pocket for the conduit pipe to fit into. This is why the holes needed to line up, so you fold the plastic over, and put a grommet through both pieces at once.
- fold the plastic in half length wise, and put a mark on each side 5ft from the middle. This gives you the marks for where the pipe should go.
- Slide your first conduit pipe into place
- Done


How to build half #2 (requires you to have the hoops setup on the hoop house for steps 1-3)
- The most annoying step :), go outside (for me it was tonight, which is about 20 degrees outside and snowy).
- Put the plastic over the raised bed, put the side with the conduit on the ground, and pull the other side over the hoop house. Make it nice and straight, and make sure again that the conduit is just barely on the ground, but that the plastic is nice and tight. I hope someday to get a video of this to make it make more sense :).
- Make a mark on the side that doesn't have the conduit right at the ground, this is where the other pipe needs to go to so that each pipe rests on the ground and there isn't any slack.
- Go back inside with your plastic, whew.
- Take your box, and put a mark 3.75 inches below that mark, and another one 2.75 inches below that mark. Why 3.75 and 2.75? That mark is the center point where your pipe will rest, and so you want that to lie right in the middle of the 1 inch and 5.5 inch. If your box is long enough you should also make a mark at 2.75 inches above the mark, mine wasn't, and that's not too bad, i can always use my cardstock to make the other mark.
- Use your box to make a bunch of marks on the plastic on the other end. you should make all 3 marks on the box (using the cardstock if u were only able to make 2).


- Use a straight edge to make a line between the lower marks, you only need to do this if you're going to cut off the extra plastic like i'm going to. If you're not going to do that, then don't worry about it.
- Punch out your holes and install the grommets just like on side #1
- Add the pipe to side number 2
- Done


Now, each winter you can just stretch the plastic over the raised beds, and use the weight of the conduit to hold down the sides. Ahh, much better. Now, this whole thing is all theory, i'll tell you in later posts how this turns out :).
The finished product:


The finished product:


Notice how the poles fit nicely on the edge and there's no extra plastic all over the place. Very nice :). Also, It's snowy outside so I had to go put the plastic on by myself and it only took a few minutes. So far i'm very happy with my upgraded hoop house.
Update 1/9/2013
I planted some of my extra garlic and onions out today (as a test to see how the hoop house works, and how much protection it adds, i'm planning on starting up some collards and lettuce as well to plant out next week, i'm hoping to get stuff in there early that dies, and plant more each week or so just to see which ones do the best).
I add an update here because the pipe also makes it really easy to pull back the plastic to work in, it was extremely nice.


